1988-1990 and March 2025
This article is dedicated to the memory of Dr. Donald Beane, 1929-2024. You can read his obituary here.
In 1989, while I was a student at the College of Wooster, I worked on a project for Dr. Donald Beane, a mathematics professor. The exact details are slightly hazy now, so please forgive any errors.
Dr. Beane had written course materials on the subject of limits and continuity, topics from introductory calculus. He made these available to students in at the form of a printed handout, which looks like it was prepared on a typewriter. I believe there was also a version of the material available as an interactive tutorial that ran on the DEC VAX minicomputer, written using something called DAL. I don’t recall much about this, unfortunately.
However it came about, Dr. Beane arranged to have me paid as a grader for the mathematics department, since there wasn’t a software development fund per se. I worked with Dr. Beane to turn his material on limits and continuity into a program for the Macintosh, which could run on the computers in the Taylor Hall computer lab. The result was a HyperCard stack called LimCon. At the time, I recall that there were several Macintosh II computers with color CRT screens in the main atrium, as well as a larger number of compact Macintosh computers (Mac Plus or similar models) in a separate computer lab. I designed LimCon to run on these Macintosh II computers.
I was an early user of, and big advocate of, Apple’s HyperCard, a remarkable, innovative programming tool that encouraged millions of people, many without any traditional programming experience, to develop personal databases, presentations, games, and many other kinds of programs. HyperCard creates documents called “stacks,” which are made up of “cards,” a familiar, easy-to-understand metaphor. Among the many innovations HyperCard introduced, from my perspective the most important ones were:
As soon as HyperCard arrived, programmers began looking into ways of extending its functionality. Stacks were limited to black-and-white, but developers like Rand and Robyn Miller used HyperCard to create graphical games like Myst, released in 1993.
Several years before Myst, beginning around 1986, I had begun teaching myself C programming, graphical user interface design, and Macintosh application development, not as part of work for any specific class, but on my own and with some friends with similar interests. I became interested in the HyperCard external command (XCMD) and external function (XFCN) mechanism, that allowed development of “plug-ins,” written in C or Pascal, to extend the capabilities of HyperCard. I developed an XFCN called graphPack, which allows HyperCard stacks to open up a separate window and draw in it, and published a couple of articles about how to write external commands and functions. These are in my portfolio now; this one gives a simplified explanation of how graphPack works. Later, at the Office of Instructional Technology, I would wind up developing a similar XFCN called sndPack (pronounced “sound pack”), a plug-in library for playing sounds in ways that HyperCard by itself could not, particularly continuous sine wave tones, which I used to implement a simulation of an audiometer — but that story should go into another retrospective article.
In March 2025 I was able to get my LimCon tutorial stack running under the Basilisk II emulator and found that it works fairly well. The program has some things about it that are awkward and ugly, though. I’ll mention the biggest one up front: the XFCN code, called from HyperCard, can open up a separate window and draw in it, and I can pass the window pointer back to HyperCard so it is persistent, and the window can stay in place, and the code can draw more in the same window over time. But there is not any mechanism by which I can ask HyperCard to manage this window when my code is not running. Since my XFCN code is not an application, it doesn’t receive events; HyperCard is the running application, and receives events. This all means that I could not make the window behave like a normal application window. I could not make it respond to mouse clicks, or allow itself to be dragged around the screen. I could not even get it to redraw itself when something else has appeared on the screen in front of it, overwriting the window’s content. So if a screen saver kicks in, or the user drags another window in front of the graphPack window, the graph is partly or fully erased, and there’s no way for my code to learn that it needs to redraw the window’s contents.
This wasn’t really a big issue for when users were assigned to run the program on the original computers in the lab, but it certainly isn’t ideal, and wouldn’t have been acceptable in a commercial application or game. I don’t know exactly how Myst avoided issues like this, but I do know that their implementation worked quite differently: in Myst, the game’s window fills the whole screen, so that the running HyperCard stack is not visible at all on the screen during gameplay, while my LimCon stack is designed to share the screen with the drawing window. Also, the team that developed Myst had more technical resources available; Myst wasn’t a project put together by a sleep-deprived college student in the time he really should have been studying.
Running on an old Macintosh II, LimCon placed the drawing window in such a way that it fit right over a specific area of the stack that I left blank for this purpose. Running under the emulator, the stack doesn’t open the window, relative to the stack’s position on the screen, quite the way it did when running on those old Macintosh II computers. The window winds up a little bit too high up, and obscures part of the title bar of the stack window. That’s one thing that doesn’t look quite right. Also, on the original hardware, the user could watch as the stack slowly drew the functions. Under emulation, the process of drawing the functions happens so quickly that the graphs appear almost instantly. No matter. Although it doesn’t work perfectly, I was quite excited to be able to run it again, and capture some screen shots.
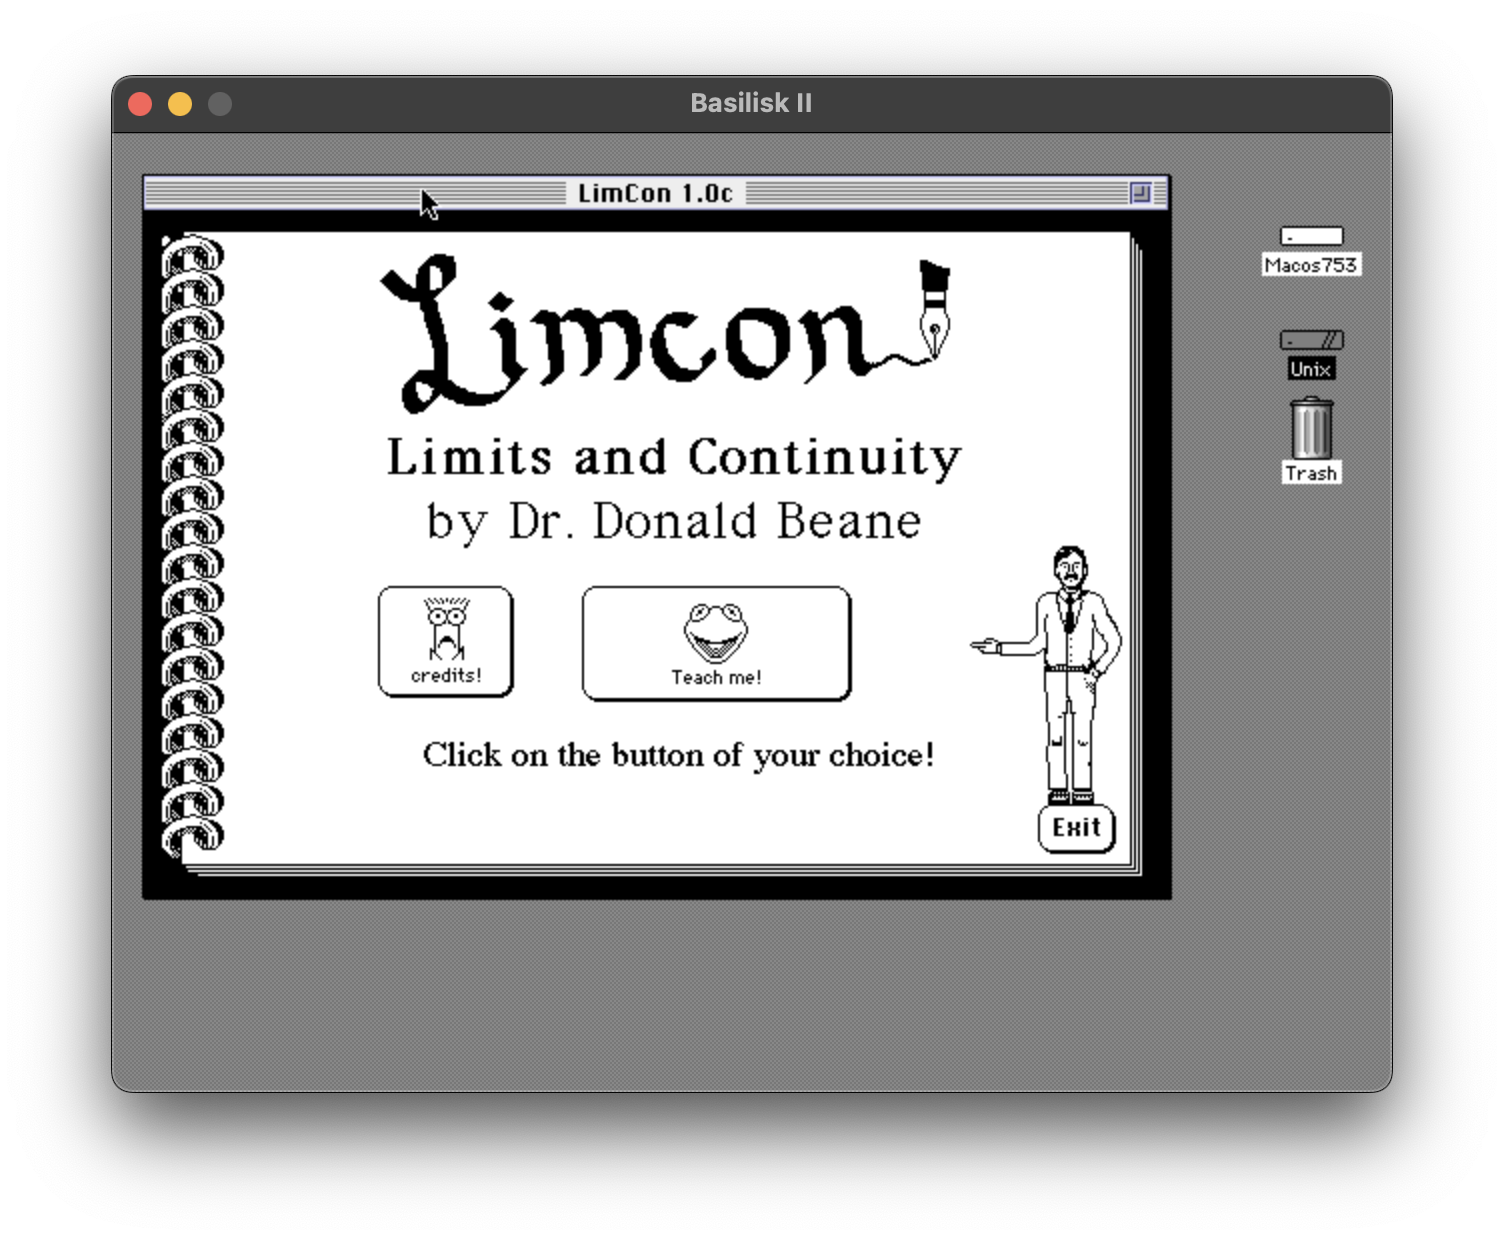
Here’s the title screen:

I was not much of an artist, and I’m still not much of an artist, but that figure on the right is supposed to be Dr. Beane. If you click on him, he utters a little scream, and his hair briefly stands on end:

I can’t recall if I ever showed him that particular little feature, but I’m confident he would have taken it in stride, as he was always kind, and had a gentle and self-deprecating sense of humor.
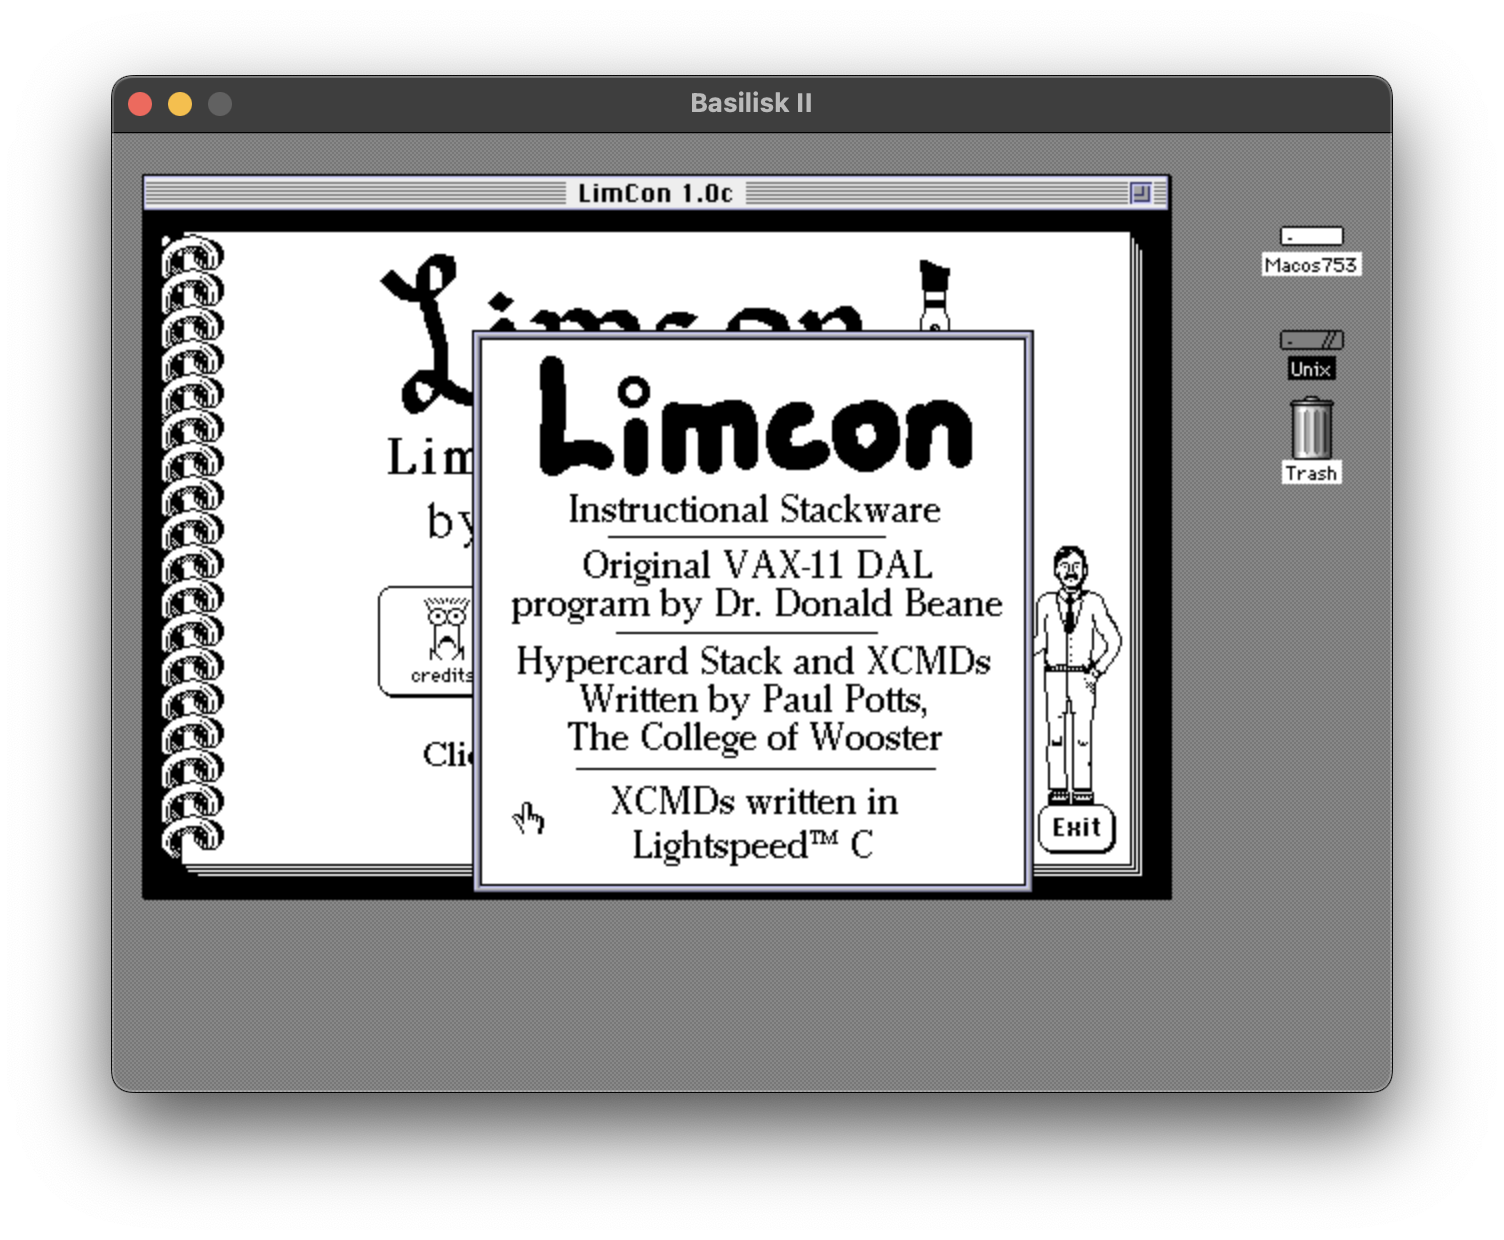
Here’s the credits window: this is another separate window opened by my aboutbox XCMD, which loads an image I added to the stack’s resource fork:
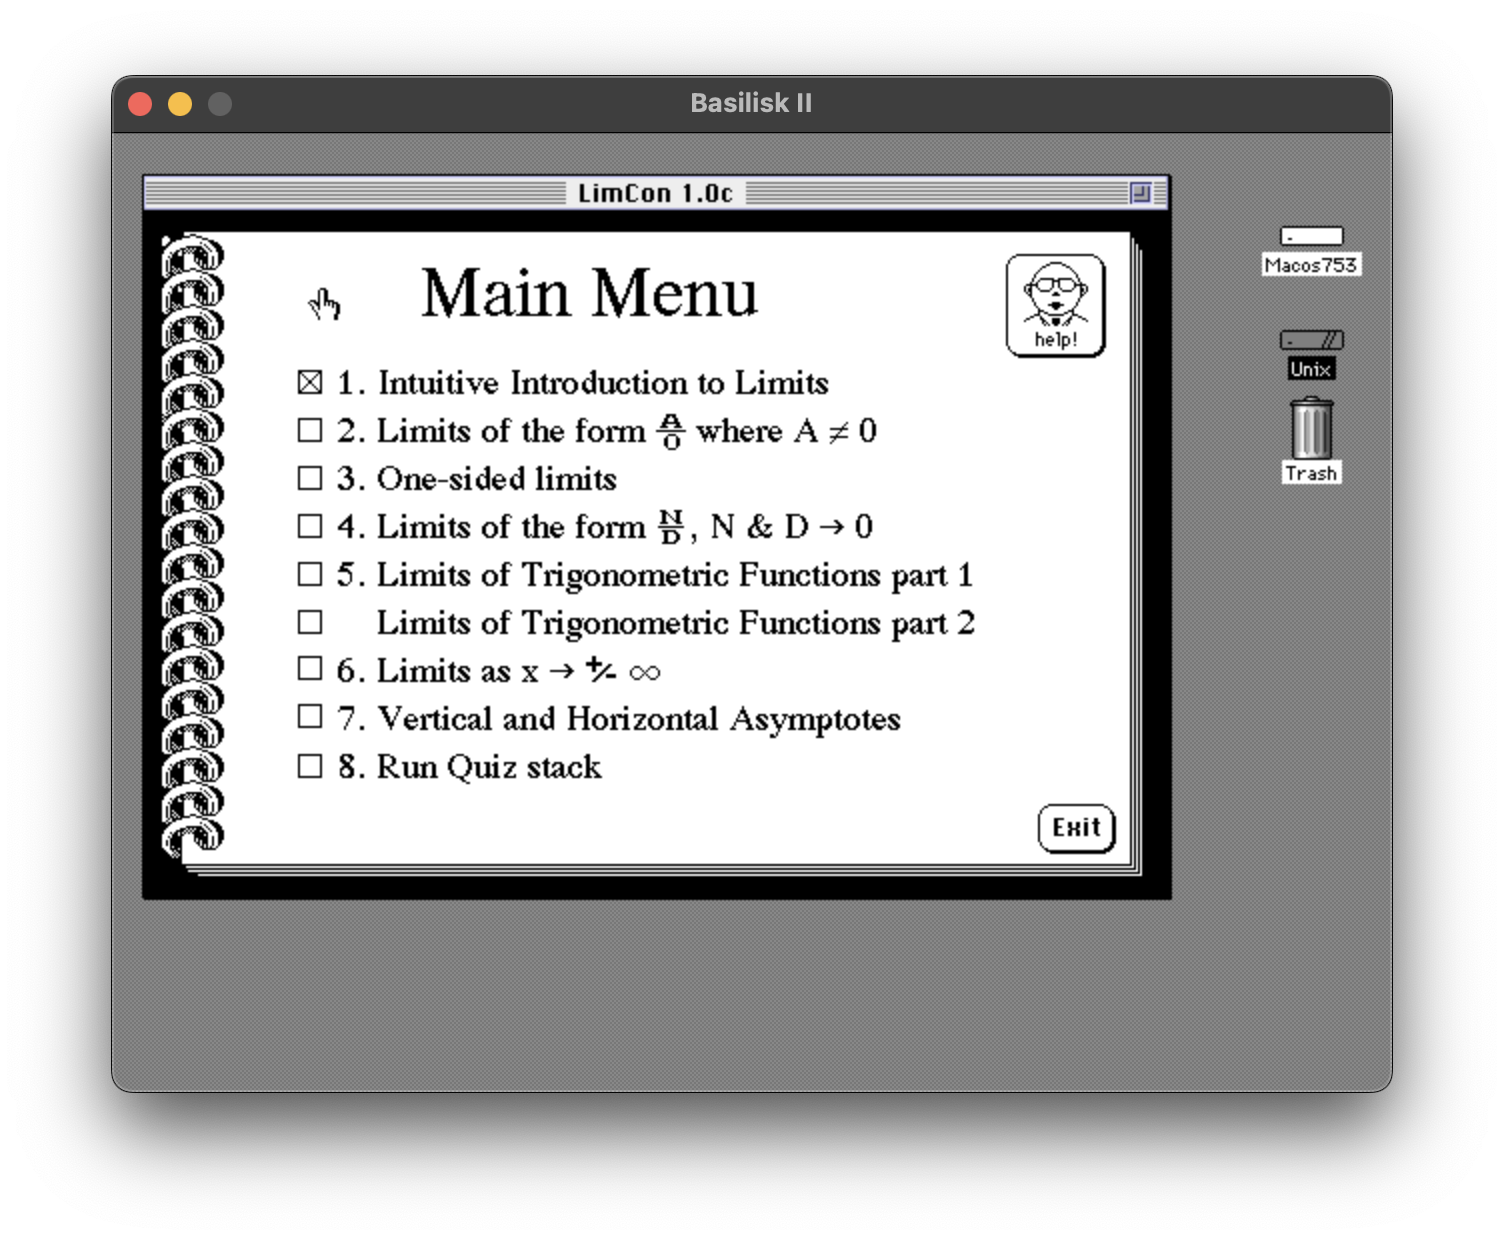
The main menu is supposed to keep track of the user’s progress by showing topics checked off after they were completed. In this screen shot, it indicates that I have already completed the first topic:
There is a separate quiz stack that the user can launch from this menu, and it does work, but unfortunately I only ever completed the first topic. The quiz isn’t especially interesting, and doesn’t use any special plug-ins or programming tricks.
Now, here’s a card showing the external window created by my graphPack XFCN. Note that it drew the graphs in magenta. This may not seem like an exciting innovation, but at the time, if you were accustomed to using monochrome compact Macintosh systems running monochrome HyperCard stacks, it was a surprise to see a stack suddenly draw something in color.
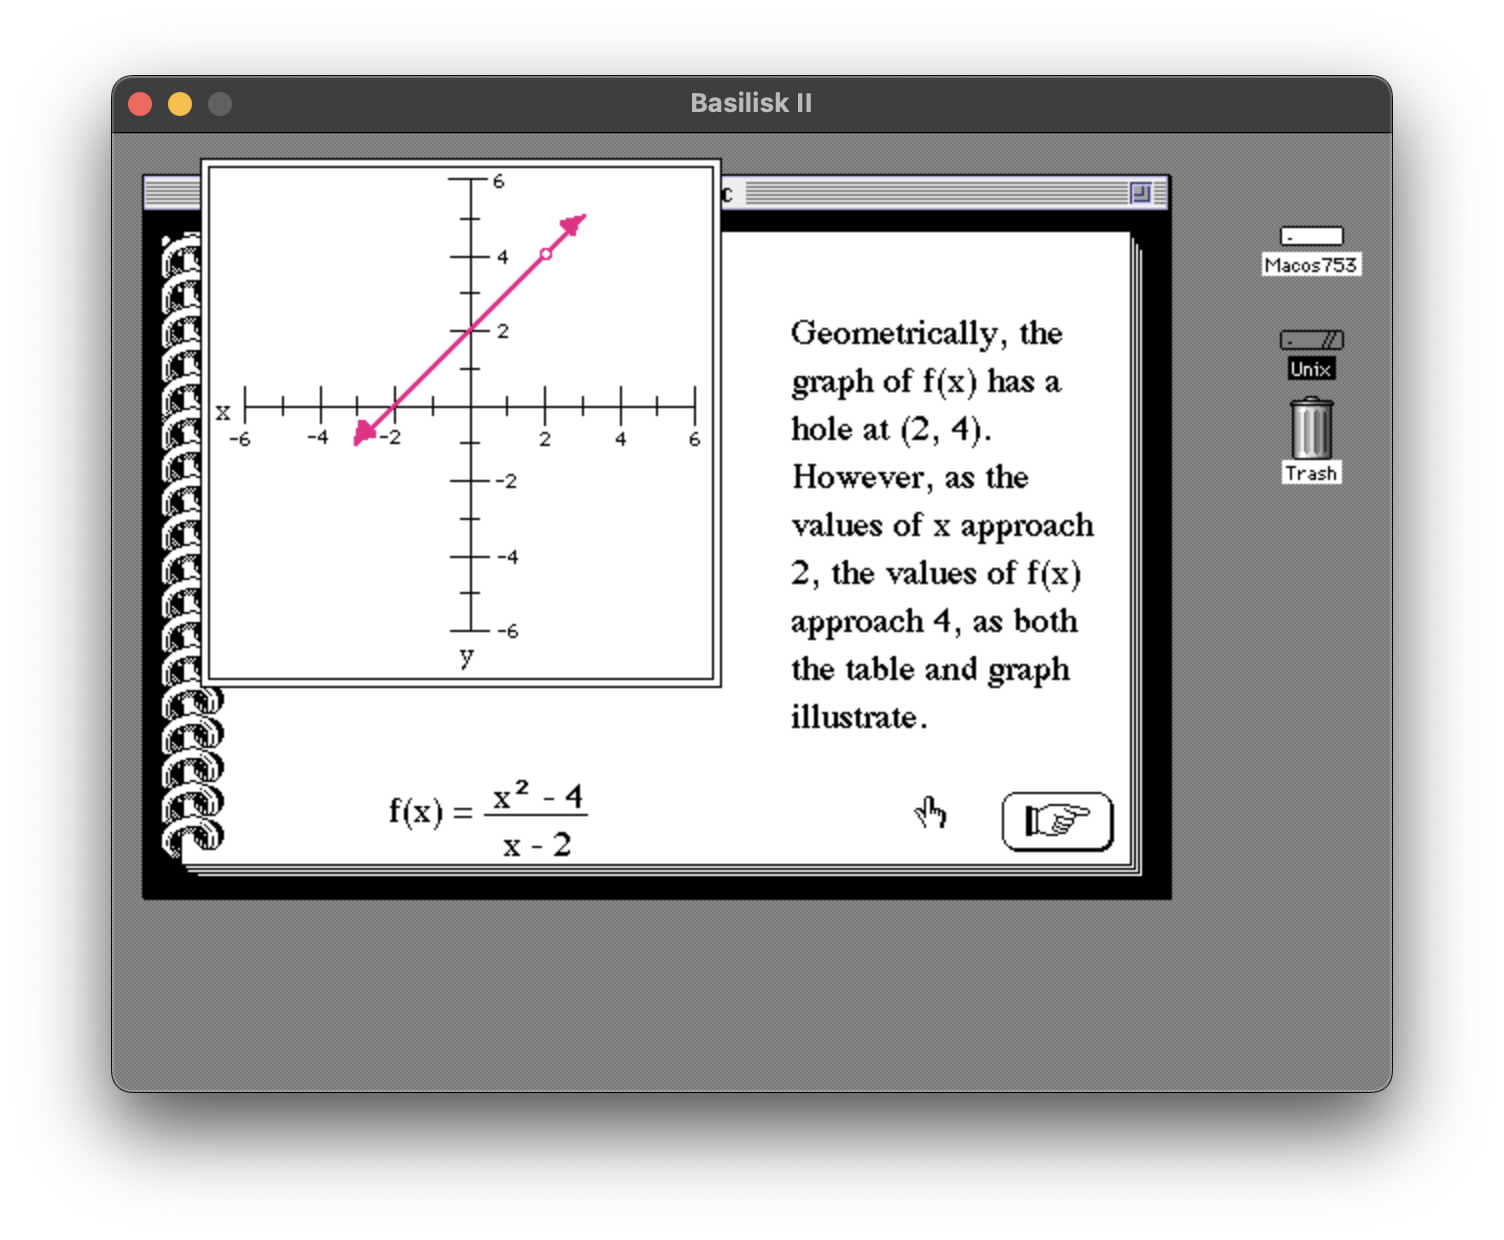
The graph of the rational function is made by drawing several pieces using different functions “packed into” graphPack. The graphPack XFCN actually contains a suite of functions. The desired function is selected by the first parameter, and any additional parameters needed are included after the first.
The support for horizontal dashed lines must have been a late addition, or I would have made it #7. It would have been very tedious to to change the numbering throughout the HyperCard stack.
First, let’s look at how the window is created. There is one additional parameter supplied after graphPack 1, …, an ID to use for a string resource that will be used to refer to the container holding the pointer. (That’s a bit complex, but necessary to allow persistent storage in HyperCard variables; let’s just say it is an indirect reference to a place we can store the pointer to the newly-createsd window. If the window has not been created yet, it comes back as zero). This is handled in getWindowPtr, which is used by each of the functions in graphPack. If the window is created, the persistent value is set with putWindowPtr.
void makeWindow (paramPtr)
    XCmdBlockPtr paramPtr;
{
    long        which_pict;
    Rect        bounding_rect;
    WindowPtr   theWindow;
    PicHandle   myWindowBox;
    Str31Handle pict_num;

    theWindow = getWindowPtr(paramPtr, 100);
    if (theWindow == 0)
    {
        pict_num = (Str31Handle)NewHandle(sizeof(Str31));
        ZeroToPas(paramPtr,(char*)*paramPtr->params[1],
                  (StringPtr)*pict_num);
        which_pict = StrToNum(paramPtr,*pict_num);
        myWindowBox = GetPicture(which_pict);
        bounding_rect = (*myWindowBox)->picFrame;
        theWindow = NewWindow (0L, &bounding_rect, "\P", TRUE,
                               plainDBox, -1L, FALSE, 0L);
        SetPort(theWindow);
        DrawPicture(myWindowBox, &theWindow->portRect);
        ReleaseResource(myWindowBox);
        putWindowPtr(paramPtr, theWindow, myStringID);
    }
    else SysBeep(40);
}
Next, let’s look at how the line is drawn. The code that handles graphPack 2, … looks like this:
void makeLine(paramPtr)
    XCmdBlockPtr paramPtr;
{
    short       horiz, vert, newhoriz, newvert;
    Str31Handle str;
    GrafPtr     xcmdWindow;
    double      *myext;

    xcmdWindow = getWindowPtr(paramPtr, 100);

    if (xcmdWindow != 0)
    {
        SetPort(xcmdWindow);
        str = (Str31Handle)NewHandle(sizeof(Str31));
        myext = (double*)NewPtr(sizeof(double));

        ZeroToPas(paramPtr,(char*)*paramPtr->params[1],
                  (StringPtr)*str);
        StrToExt(paramPtr, *str, myext);
        horiz = scalex(*myext);

        ZeroToPas(paramPtr,(char*)*paramPtr->params[2],
                  (StringPtr)*str);
        StrToExt(paramPtr, *str, myext);
        vert = scaley(*myext);

        ZeroToPas(paramPtr,(char*)*paramPtr->params[3],
                  (StringPtr)*str);
        StrToExt(paramPtr, *str, myext);
        newhoriz = scalex(*myext);

        ZeroToPas(paramPtr,(char*)*paramPtr->params[4],(
                  StringPtr)*str);
        StrToExt(paramPtr, *str, myext);
        newvert = scaley(*myext);

        DisposPtr(myext);
        DisposHandle(str);

        ForeColor (magentaColor); /* in color on a Mac II */
        PenSize(2,2);
        MoveTo (horiz, vert);
        LineTo (newhoriz, newvert);
    }
    else SysBeep(40);
}
That seems like a lot of code to do something as simple as drawing a line segment, and it is, but it is all necessary. If the window pointer is zero, something has gone wrong — we may be calling graphPack functions in the wrong order, trying to use a window before it has been created. In this case the function just beeps and exits. A user should never hear this beep, but it was helpful to me while I was debugging the stack logic. If the window pointer is not zero, the function executes several similar chunks of code that take care of converting additional parameters passed to graphPack — the line’s endpoint coordinate pairs — from floating-point numbers, passed as strings, into short (16-bit integer) types. HyperCard uses Pascal-style strings, with a length byte first, and C uses C-style strings, with no length byte but a terminating zero byte, and so there is overhead to convert between them.
All this is tedious and no doubt contributed to the slowness of the original drawing. From my current perspective in 2025, I’m not sure that the code really needed to allocate str and myext dynamically, although there may have been a reason for doing it this way that I can’t now recall, such as a strict limit on the stack space that an XFCN was allowed to use. I also see opportunities for refactoring this function, by using some helper functions. But it worked, and that was my primary goal at the time.
After all that setup, we have our coordinate pairs, and the rest is straightforward: we set the color, set the pen width (two pixels wide), move to the starting point, and draw a line to the ending point.
After the curve of the function is drawn, the stack calls graphPack3, … to draw the arrowheads at the ends of the curve, which uses this function:
void arrowHead(paramPtr)
    XCmdBlockPtr paramPtr;
{
    short horiz, vert, angle;
    #define rectOffset 25 /* size of starting Rect */
    #define arrowWidth 30 /* width of 1/2 the arrowhead in degrees */
    Rect theRect;         /* to draw wedge in */
    Str31Handle str;
    double *myext;
    GrafPtr xcmdWindow;

    xcmdWindow = getWindowPtr(paramPtr, myStringID);
    if (xcmdWindow != 0)
    {   SetPort(xcmdWindow);
        str = (Str31Handle)NewHandle(sizeof(Str31));
        myext = (double*)NewPtr(sizeof(double));

        ZeroToPas(paramPtr,(char*)*paramPtr->params[1],
                  (StringPtr)*str);
        StrToExt(paramPtr, *str, myext);
        horiz = scalex(*myext);

        ZeroToPas(paramPtr,(char*)*paramPtr->params[2],
                  (StringPtr)*str);
        StrToExt(paramPtr, *str, myext);
        vert = scaley(*myext);

        ZeroToPas(paramPtr,(char*)*paramPtr->params[3],
                  (StringPtr)*str);
        angle = (short)StrToNum(paramPtr,*str);

        DisposHandle(str);
        DisposPtr(myext);

        MoveTo(horiz,vert);
        SetRect (&theRect,
                 horiz - rectOffset/2,
                 vert - rectOffset/2,
                 horiz + rectOffset/2,
                 vert + rectOffset/2);
        angle -= (180 + arrowWidth);
        PaintArc (&theRect, angle, 2 * arrowWidth);
    }
    else SysBeep(40);
}
As you can see, there’s some similar overhead for extracting parameters. The arrowheads are not really triangles, but acute sectors of a circle — a bit more complex than is apparent at first glance! Sadly, they don’t quite look perfectly aligned with the line representing the graph of the function, so a little more tweaking was probably in order, but keep in mind that as a student, the time I could put into this project was limited.
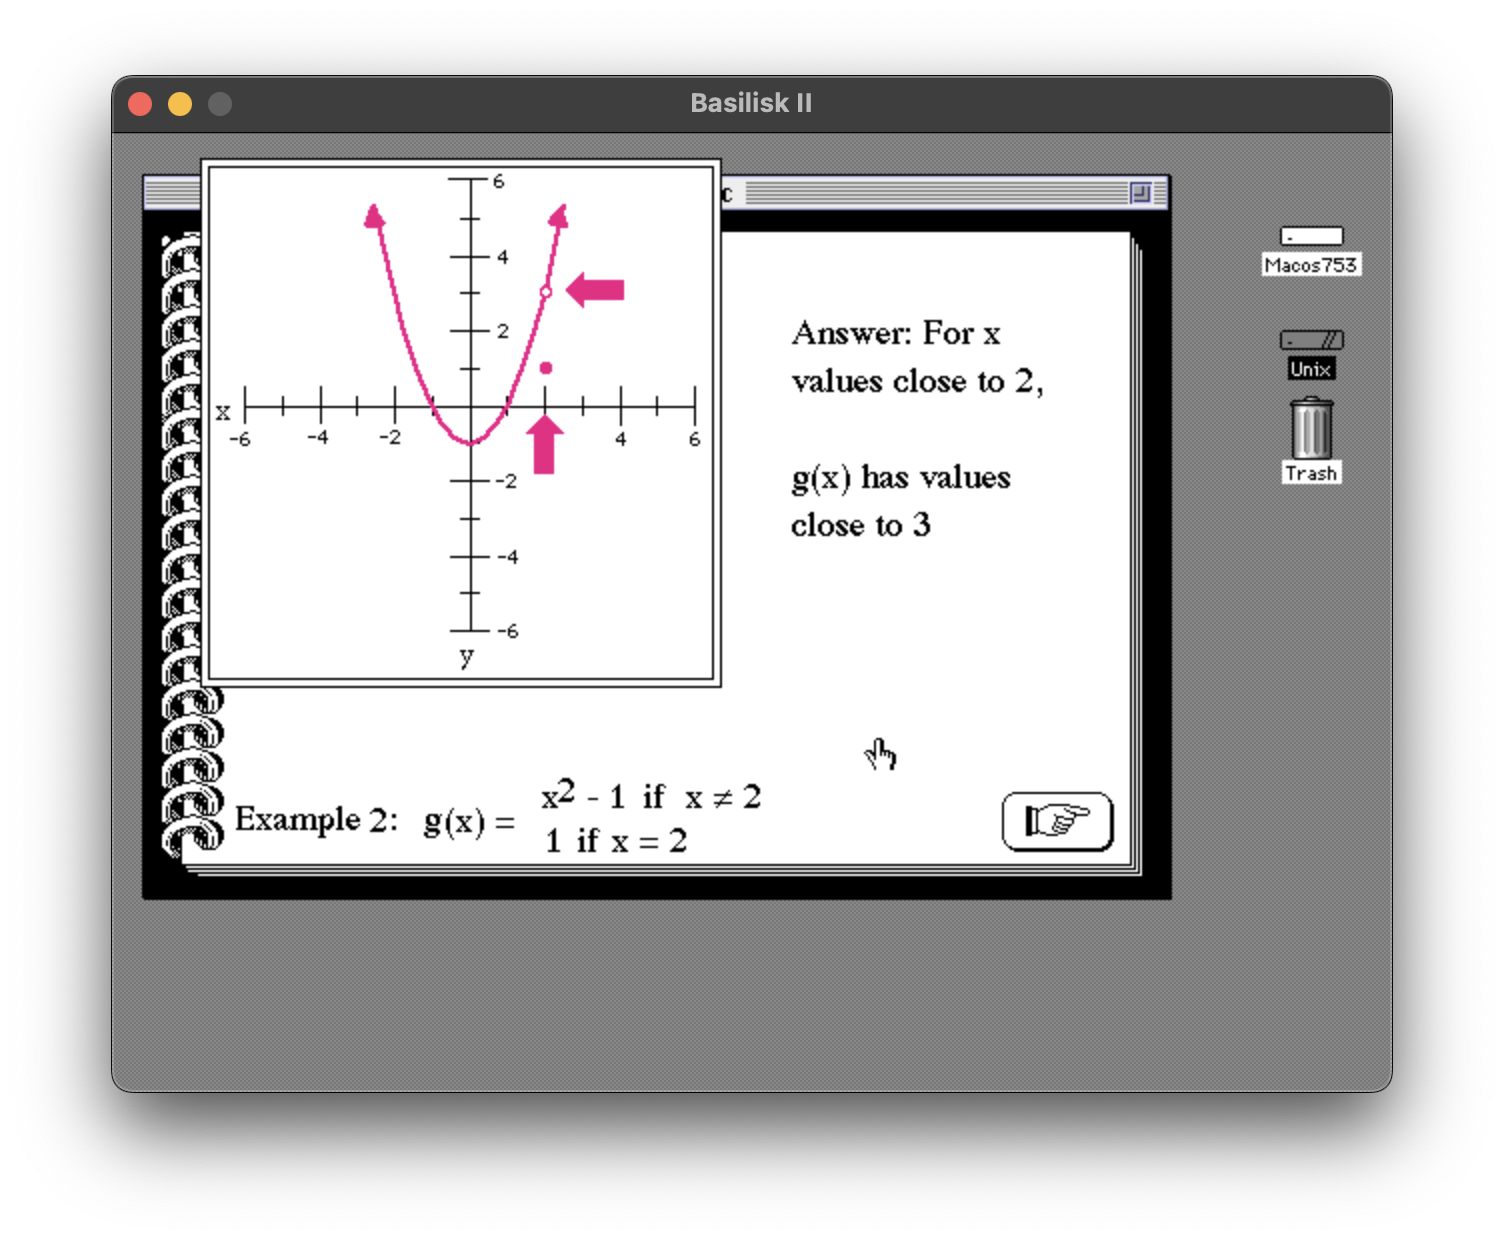
The little circle indicating the discontinuity at x = 2 is drawn by the following code, handling graphPack 4, …:
void missingPoint(paramPtr)
    XCmdBlockPtr paramPtr;
{
    Rect theRect; /* to draw circle in */
    theRect = SetupPoint(paramPtr);
    ForeColor(whiteColor);
    PaintOval (&theRect);
    ForeColor(magentaColor);
    PenSize(1,1);
    FrameOval (&theRect);
}
In this C function, The SetupPoint function is called, and returns a rectangle. The code will draw the circles inside that rectangle, using the PaintOval QuickDraw function, which can draw any filled oval (a circle is just a special case of an oval). The code first draws the filled circle in white, erasing a circular area of the graph so that the circle will appear hollow, and then draws just the outside of the circle using FrameOval, in magenta.
Now that we’ve looked closely at what parts of graphPack do, let’s look more closely at what parts of the HyperTalk code in the stack do. Let’s consider how the quadratic function shown on the card below is drawn:
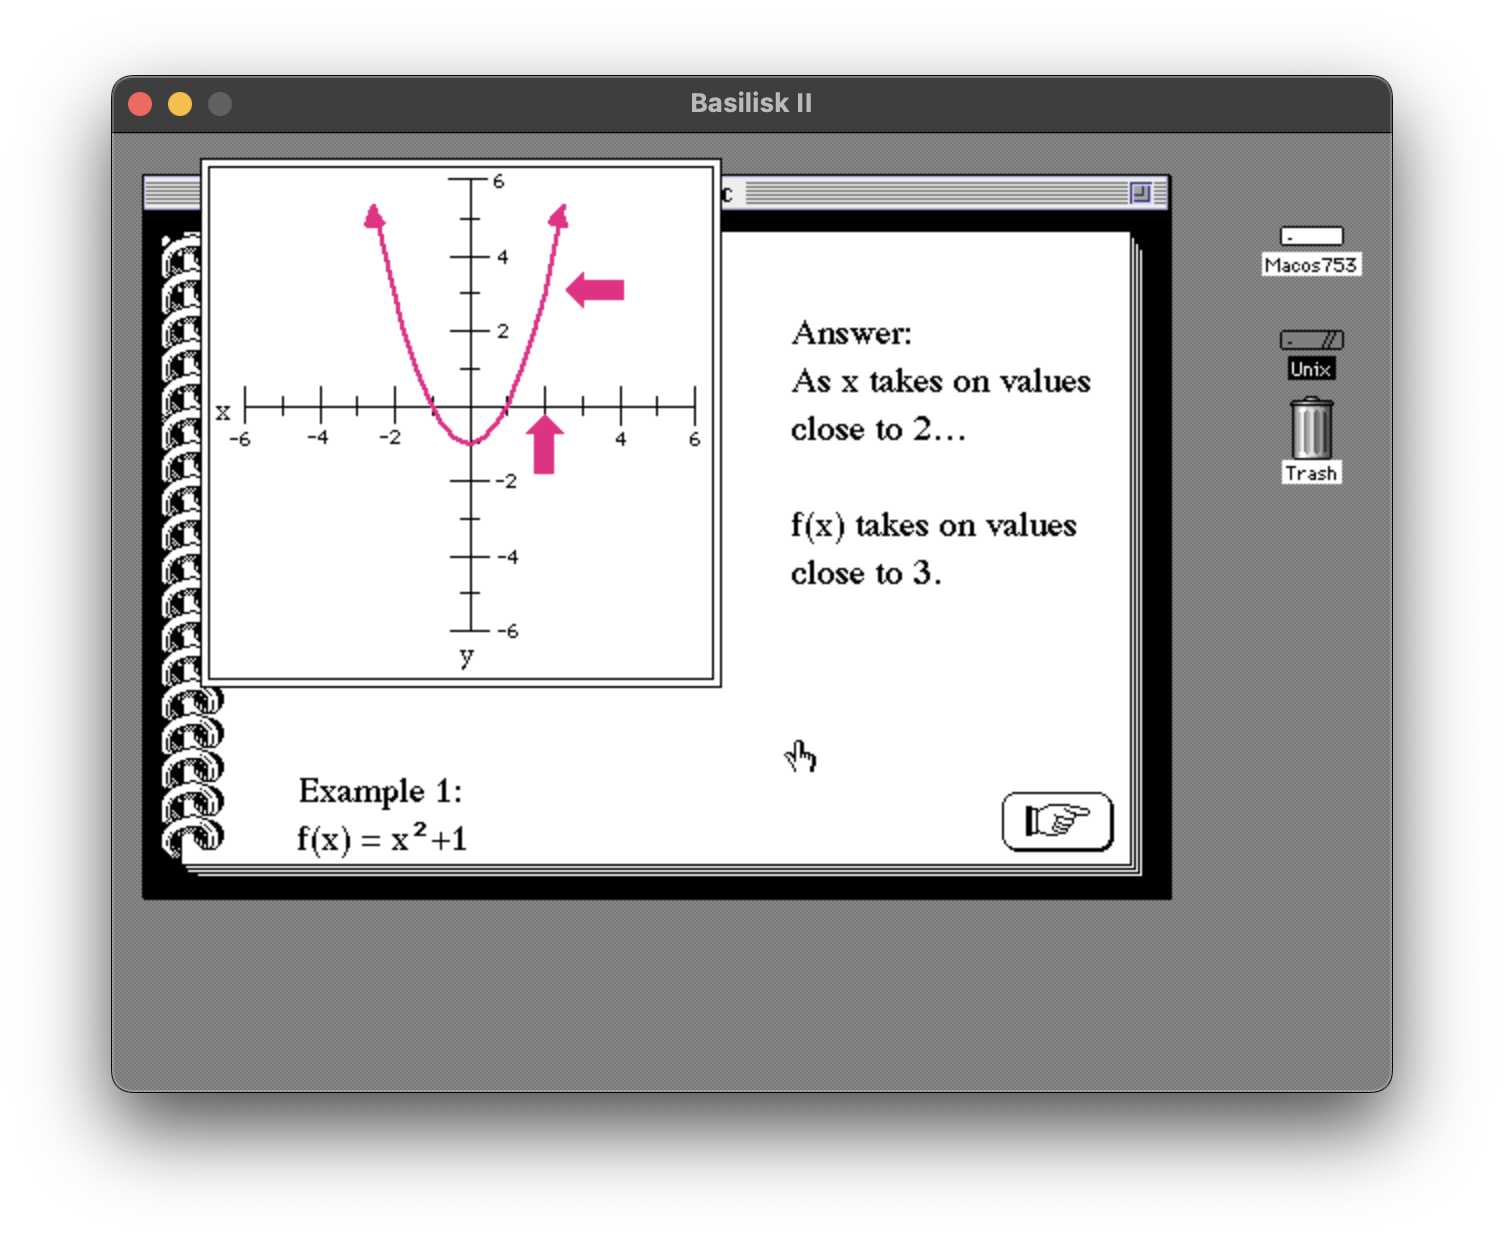
How did it draw smooth curves? Well, they aren’t really smooth curves. Calculating a value for every pixel along the curve of the function would have taken too long, so LimCon really calculates the endpoints of a series of short line segments that approximate the curve. Here’s the HyperTalk code that runs when the user reaches this card:
on openCard
  global thefunction, x, y, xmin, xmax, xinterval, xplot, yplot
  graphPack 1,1
  put "x*x-1" into thefunction
  put -2.5 into xmin
  put 2.5 into xmax
  put .25 into xinterval
  put plotit() into it
  put xmin into x
  put value of thefunction into y
  graphPack 3, x, y, 350
  put xmax into x
  put value of thefunction into y
  graphPack 3, x, y, 10
  graphPack 4, 2, 3
  graphPack 5, 2, 1
end openCard
Note that the code above invokes a function called plotit, which draws a given function as a series of segments:
function plotit
  global thefunction, xmin, xmax, xinterval
  put xmin into x  --initial value of x
  repeat while x<=xmax
    put x*2 into oldx
    put (value of thefunction)*2 into oldy
    add xinterval to x
    --if we have gone too far, draw to the endpoint only
    if x>xmax then
      put xmax into x
      put value of thefunction into y
      put x*2 into newx
      put y*2 into newy
      graphPack 2, oldx, oldy, newx, newy
      exit repeat
    end if
    put x*2 into newx
    put (value of thefunction)*2 into newy
    graphPack 2, oldx, oldy, newx, newy
  end repeat
  choose browse tool
end plotitThe HyperTalk function plotit receives a parameter called thefunction, but in HyperTalk, all parameters are strings. How does this work? The simple quadratic function itself is stored in a global variable thefunction as the string “x*x-1,” and is evaluated repeatedly; each time it is evaluated, it is able to access the local variable x by name. HyperTalk lets us pass a function as a value, and execute the function in a context where the function can reference local variables by their names. This is somewhat similar to the way we could use eval in the Scheme programming language to evaluate a function stored in a string at runtime, which is a very powerful feature!
As the user progresses through the stack of cards, later cards can continue to draw in the same window, rather than starting over again with an empty window. As the explanatory text on the quadratic function continues to the next card, the stack uses graphPack 7, … to draw the big pointers, using this function:
void drawPointer(paramPtr)
    XCmdBlockPtr paramPtr;
{
    PolyHandle arrowPoly;
    arrowPoly = SetupPointer(paramPtr);
    ForeColor(magentaColor);
    PaintPoly(arrowPoly);
    KillPoly(arrowPoly);
}
This code is similar to the code that draws the empty circles indicating discontinuity, in that it calls a function, SetupPointer, to prepare for drawing. In this case, the object returned by the helper function is not a rectangle indicating the bounds of the circle, but a QuickDraw polygon, created by the helper function as a series of lines, drawn according to the desired horizontal or vertical orientation. I won’t include the whole SetupPointer function, since it has more tedious parameter-handling overhead, but here is the part of the code that creates the polygon out of a series of line segments:
PolyHandle arrowPoly = OpenPoly();

switch (rotation) /* horizontal orientation */
{
    case 0:
        horiz += 10;
        MoveTo(horiz, vert);
        LineTo(horiz+10, vert-10);
        LineTo(horiz+10, vert-5);
        LineTo(horiz+30, vert-5);
        LineTo(horiz+30, vert+5);
        LineTo(horiz+10, vert+5);
        LineTo(horiz+10, vert+10);
        LineTo(horiz, vert);
        break;
    case 1:
        vert += 5;
        MoveTo(horiz, vert);
        LineTo(horiz+10, vert+10);
        LineTo(horiz+5, vert+10);
        LineTo(horiz+5, vert+30);
        LineTo(horiz-5, vert+30);
        LineTo(horiz-5, vert+10);
        LineTo(horiz-10, vert+10);
        LineTo(horiz, vert);
        break;
}
ClosePoly();
return arrowPoly;
As the user progresses through the topic, the stack continues to use the capabilities of graphPack. In the following screen shot, it has used graphPack 4, … to draw a missing-point discontinuity, and graphPack 5, … to draw the removable point, which is drawn like the missing-point discontinuity, except filled in rather than hollow:
I’ll share one more – here’s a screen shot of LimCon drawing a function with a vertical asymptote:
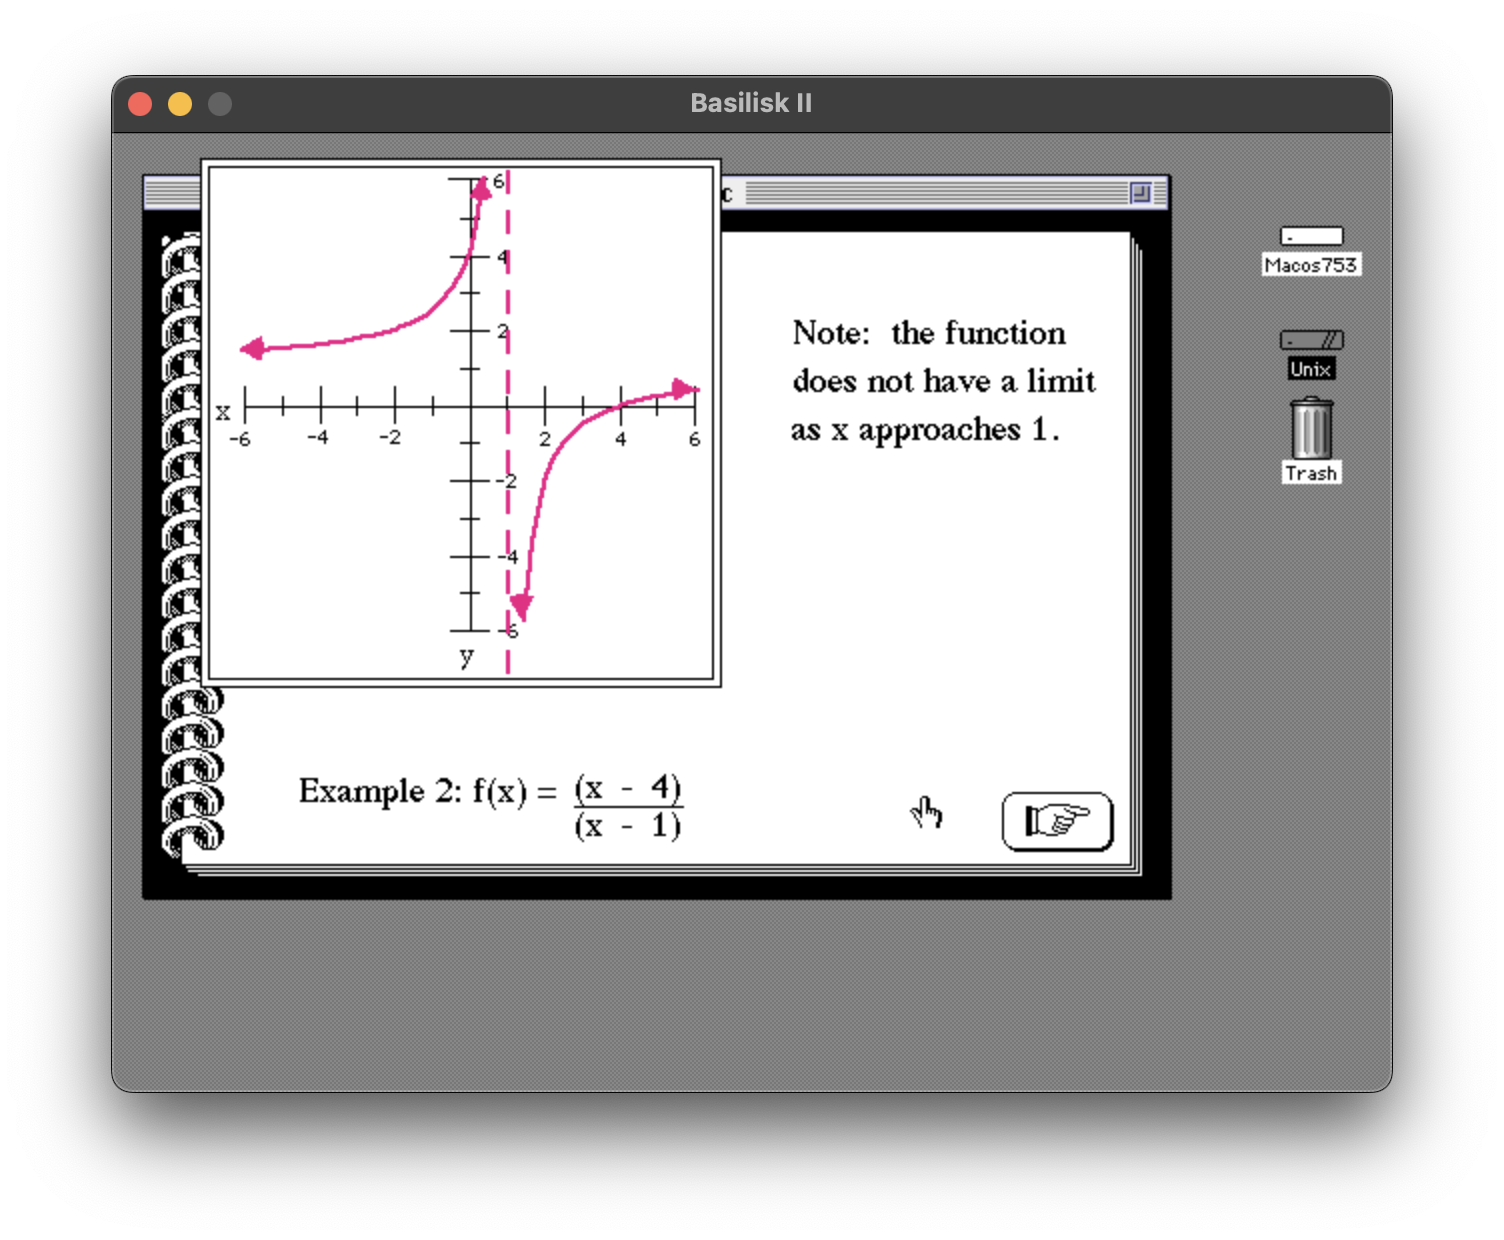
Here’s the part of the code that draws the dashed line:
MoveTo(horiz, (xcmdWindow->portRect.top) + 5);
ForeColor(magentaColor);
PenSize(2,2);
GetPen(&ourpenloc);
while (ourpenloc.v <= (xcmdWindow->portRect.bottom) - 15)
{
    LineTo(ourpenloc.h, ourpenloc.v+10);
    MoveTo(ourpenloc.h, ourpenloc.v+20);
    GetPen(&ourpenloc);
}
And that just about covers how LimCon draws functions with graphPack.
Running this stack again in 2025, and looking at the files I saved, I notice a few things I don’t fully understand. I am struggling to remember just how I created it. I recall how I wrote the plug-in code. But how did I render all those formulas? I don’t quite know! I’ve only included a few screen shots, but there are 258 cards in the stack, most of which contain formulas.
I do have a couple of files that appear to be old Microsoft Word for Macintosh files. LibreOffice can open these, and I can also open them with an ancient version of Microsoft Word running on the Basilisk II emulator, but with either of these, the files appear to contain a confusing mix of stuff that looks like the LimCon formulas, and stuff that looks garbled, full of slashes and Greek and accented characters. Maybe I’m missing a font? I think I might have used markup that Microsoft Word supported back then for rendering mathematical formulas, even if I don’t know how to get it to look right today. But there still would have been an awful lot of screen-shotting, copying and pasting images, etc. — and, probably, hours of tweaking graphics with HyperCard’s pencil tool — to get these rendered formulas into the HyperCard stack. And there’s also a 30KiB binary file called LIMCON — what is it? An old file for the VAX? I just don’t know. I’ll update this article if I figure it out.
I have written two other articles that you might find interesting. The first one is called Understanding Lightspeed C: Talking Back to HyperCard. In this article, which was originally published in Washington Apple Pi Journal in 1989, I describe a simplified version of graphPack and explain the mechanism by which HyperCard can call code in an XCMD, and vice-versa.
After writing this retrospective article, I decided to take a crack at improving the simplified graphPack code and building and running it under emulation. I describe what I did in Talking Back to HyperCard Revisited. That article contains the full source code for my simplified version of graphPack, as well as links to download my THINK C and HyperCard files.
My memories of the time I spent at the College of Wooster are fading a bit now after 35 years, but I am grateful that I saved a number of old documents, including this HyperCard stack, and the source code for the plug-ins, to jog my memory. The memories are happy ones. Although I didn’t do all that well in his Calculus 111 class — which I don’t blame him for, as I was not a very good math student at the time — I did like Dr. Beane personally, look forward to our meetings, and enjoy working on this project. I even learned a few things. I am grateful to Dr. Beane and the College of Wooster for providing me with the opportunity, environment, and support I needed to work on projects like this. I hope you have enjoyed this retrospective!